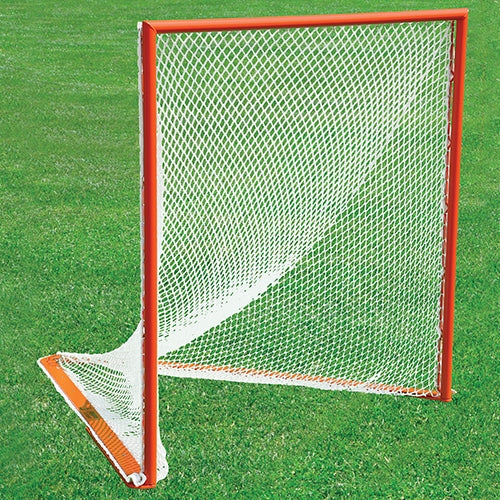
• Align the top corners of both the goal and the net, as well as the back end of the base and net. Lacrosse nets usually have the edges lined with thick industrial nylon or canvas where the net makes contact with the goal. There are often two nylon spines running from the two top corners to the back of the base, forming a tent. These spines should be on the outside of the goal not the inside.
• Using fasteners, Velcro strips or zip ties, or short pieces of string, fasten the net into one corner of the goal putting one fastener along the horizontal pipe and a second fastener on the vertical pipe to give support.
• Pull the top portion of the net taut across the top pipe of the goal, making sure the net is properly reaching from corner to corner across the top pipe. Using the fasteners, attach the net into the opposite corner of the goal putting one fastener along the horizontal pipe and a second fastener on the vertical pipe to give support.
• Be sure the net is flat along the outside edge of the goal and not on the inside edges of the goal where it may interfere with game play. Using the fasteners, fasten the net taut to the back of the goal where the pipes come together to form a V. Attach two fasteners to the net and pipes at the back of the goal make sure to center the net within the V of pipes.
• Using your fasteners attach the net to the lower right corner and lower left corner of the goal, where the uprights meet the ground bars.
• After you have attached the net to the frame with the fasteners the goal should look symmetrical and almost ready for game play. Now you can begin stringing the net.
• Take the lacing cord that was provided with your goal in your hands and locate the midpoint. Using a pair of scissors or sharp knife, cut the lacing cord approximately 4 feet from the center. This will provide you with two pieces of lacing cord. We recommend heating the edges of the cord with a match or lighter to prevent fraying.
• Take the shorter of the two pieces of cord in your hand. Tie one end to the lowest point on the left side upright of the goal. Begin weaving the string through every other opening in the mesh up the left side upright and across the top pipe then down the right side. Tie off the lacing cord when you reach the bottom of the right side upright.
• Now take the longer piece of lacing cord and attach it to the ground pipe where it meets the bottom of the right side upright. Begin weaving the string through every other opening in the mesh along the right side ground bar. When you reach the bend at the back of the goal begin lacing through every opening in the mesh. Continue with every other hole in the mesh until you exit the curve on the left side. At this point you will be at the rear of the goal on the left side switch back to weaving every other hole and continue to the front of the goal where the bottom bar meets the left side upright. Tie off the lacing cord and you are ready to play lacrosse on your newly strung goal.
For Goals that have string rails – Follow the instructions above, but instead of lacing around the pipe, you will weave the lacing cord through every other mesh opening and through every corresponding rail opening. At the curve at the rear of the goal you will be weaving through every mesh opening which will cause you to use each section of stringing rail twice.